


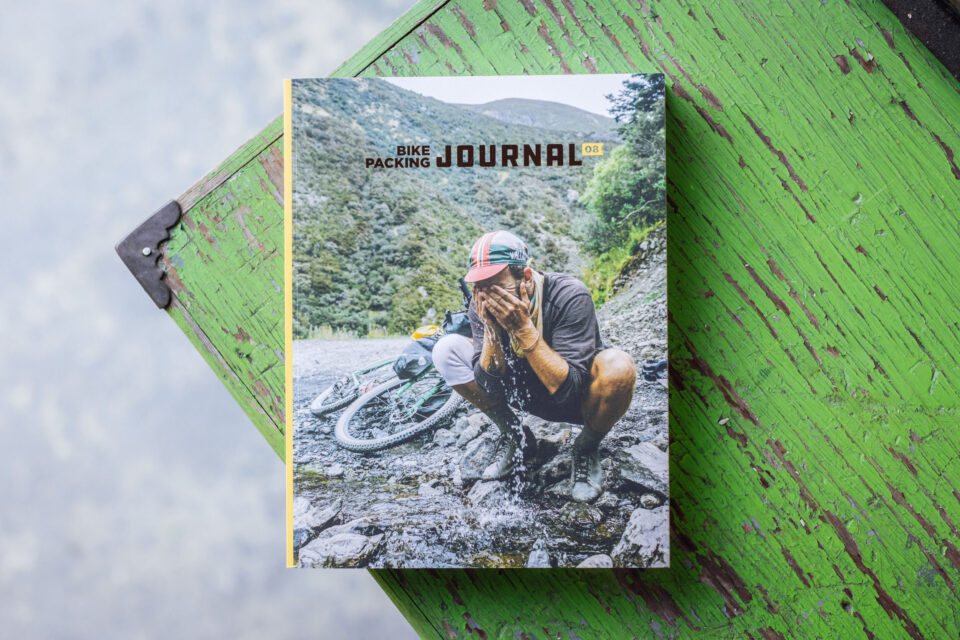
Have a Safe Journey + Plan a Bikepacking First Aid Kit
Share This

What essentials belong in a proper first aid kit for backcountry bikepacking? How about items to include for an international dirt tour in the developing world? Find out from our resident nurse. Plus, bikepacking safety gear and necessary backcountry planning…
Accidents do happen. Take it from someone who catapulted into five foot drainage ditch while cycling through Zambia. Although a basic first aid kit isn’t likely to save your life in the case of a major emergency, it can buy a rider the time to get out of the woods and find medical assistance. Better yet, proper and timely treatment of minor wounds and ailments might make the difference between being able to complete an intended route and having to cut it short.
Preparation and Backcountry Safety
Before we dig into the details about first aid, there are a few general backcountry safety precautions to consider. The most proactive thing you can do to prevent getting into a survival situation is to do your preliminary research. Aside from injury, which we’ll get to in the first aid kit section, there are three factors that can turn a completely good trip into a bad one:
1. Changing Weather Conditions
As cliche as it might sound, no one can predict the weather, especially in the mountains. Even where we live in the southern Appalachians, we’ve seen temperatures drop 30 degrees in July while deep in Pisgah National Forest. One should always be prepared for the worst. You can find out a little more about mountain weather preparation here.
2. Equipment Failure
The ability to repair your bike and gear shouldn’t be taken lightly. Inspect your bike before setting out, and think through a proper repair kit. Also, factor in backups and the ability to repair and replace gear such as the cleats on your shoes, your tent, and cooking gear.
3. Misjudged Terrain
Know the terrain you are going to ride before you set out. One of the most common setbacks on a bikepacking trip, as well as many adventure exploits, is when the journey takes longer than expected. This is often due to the terrain being more difficult than anticipated. And with time loss, there is a lot at stake. Food and water rationing is the most obvious point of danger, but also consider fatigue and the skill level of your trip mates.
The most important element of preparation is to research the trails and areas you are going to ride through. Over-plan and triple check the estimated time vs mileage of your route, pack a few extra calories, and know your water sources. If you are going somewhere new, ask locals, call bike shops, or post questions on our comments under various routes. If you are traveling overseas, check the various forums and other websites.
Requisite Emergency Gear
A few items that should make the gear list of any backcountry bikepacker with a tendency toward self preservation:
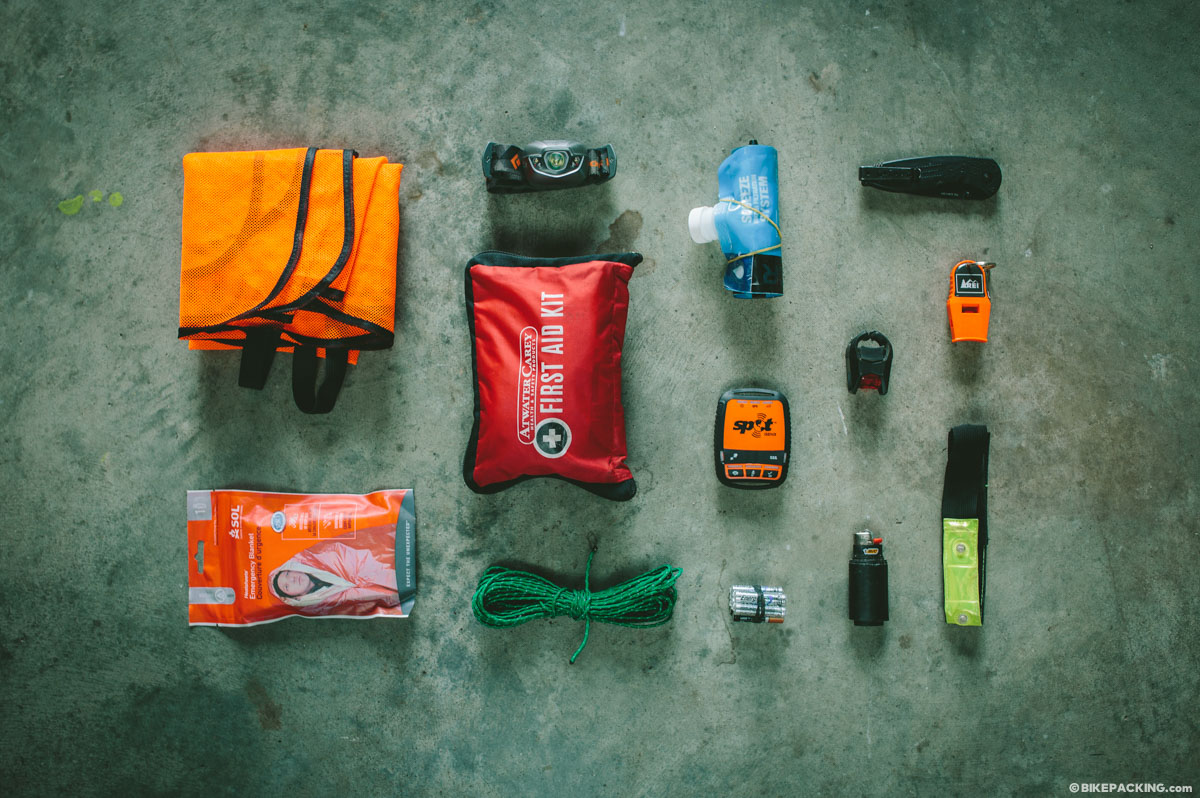
- Helmet: There have been points in time when I went sans nut-case, but I’ve heard too many gore stories. Always wear a helmet.
- Bear Whistle: It’s not really a bear whistle, but it could be, and has been used as such. Really the reason to carry a whistle is to call for help in the event of an injury or notify a riding partner of an issue before he or she gets too far down the trail.
- Emergency blanket: Not necessary for many situations, but if you’re traveling light in a mountainous region where weather can be unpredictable, it’s a great accessory, and very lightweight. Check out S.O.L’s emergency Bivvy.
- Cord: We recommend about 30-40’ of cord or line to tie up your food in areas where bears are a problem. This will allow plenty of room for reaching higher branches. Nine and a half times out of ten I tie my food up in a bear bag at night. One of the few times I didn’t, I had a bear sniffing around my tent at 4AM. According to most sources, a bear bag should be about 12-15 feet above the ground and six feet away from the trunk of a tree. Also, some suggest that the bear snag be about 100′ away from camp, and 300′ in grizzly country.
- Blaze orange: Wearing blaze colors is mandatory in fall months within many portions of the US. You never know when you’re waltzing through a hunt and visible from someone’s deer stand. In addition, if your route involves a little pavement, a lightweight orange vest is a good idea.
- Spot Tracker: The Spot acts as an emergency beacon and notification device when you are out of cell range.
- GPS: The modern day compass, and map. Carrying a GPS, and sometimes maps in addition, is especially important when covering new territory. In addition, make sure to carry a couple of sets of spare batteries.
- Headlamp and Blinkie lights: A rear blinker is a good idea for times when you have to connect a paved road.
- Gorilla tape and lighter: Store in a plastic bag to make sure it stays usable.
- Water Filter: And/or iodine/purification tablets; we recommend the Sawyer Mini.
- Folding Knife.
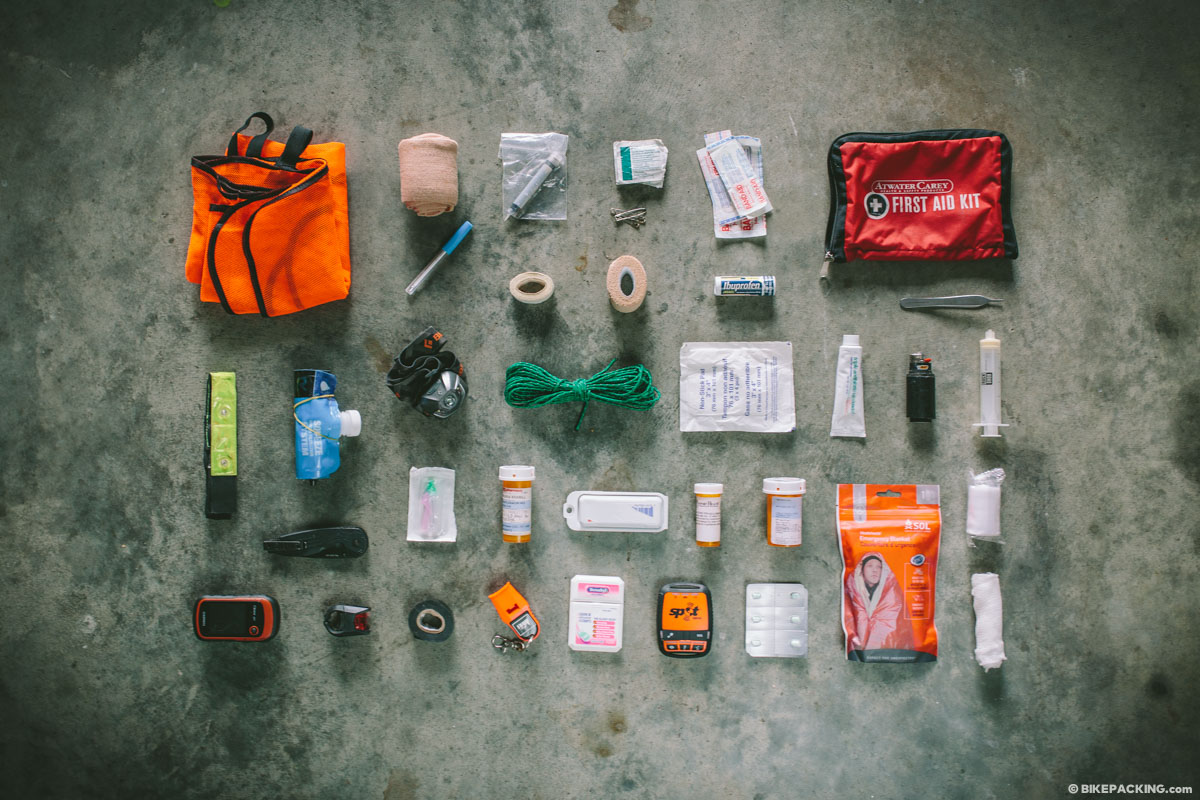
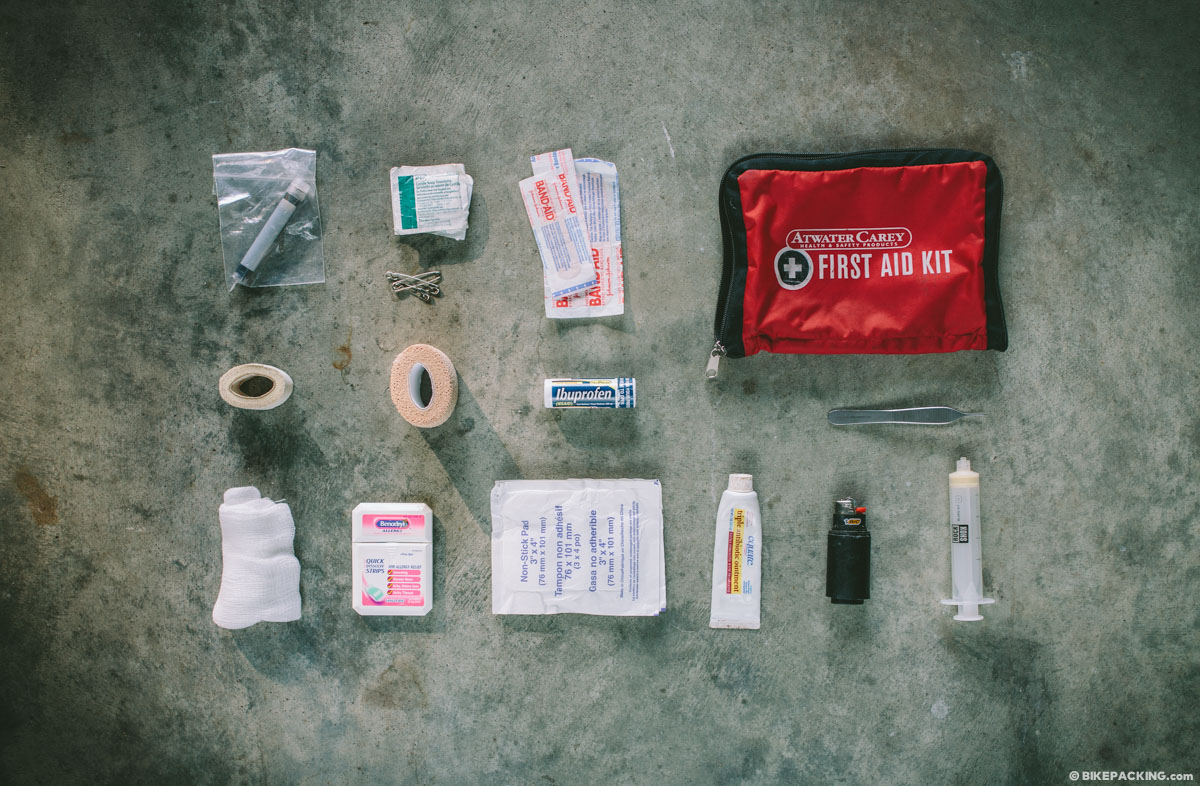
Building a Bikepacker’s First Aid Kit
There are tons of pre-packaged first aid kits available for purchase at your local pharmacy, recreational outfitter, or on-line. Pre-packaged kits have a couple of advantages over home-made kits. They usually cost less than putting together your own kit and come in a specially designed storage bag with handy pockets and compartments. On the downside, they are often unnecessarily bulky and contain items that are poorly made (i.e plastic tweezers) or simply non-essential.
There are advantages to putting together your own kit…
Because you have to purchase more than a single Bandaid or Betadine prep pad, you’ll have a small stock from which you can resupply your kit(s) as needed. Better yet…you could put together a kit for a friend (nothing says “I care” like plastic gloves and sterile gauze). You can also purchase higher quality, long-lasting supplies, such as stainless steel tweezers. And, most importantly, you can individualize your first aid kit to fit your needs.
Like I said, make a kit so that it fits your needs. Where will you be traveling (domestically or internationally, industrialized, developing, or devolving)? How long will you be on the road? Will you be touring along nicely graded rail trails, sticking to the pavement, or grinding gravel (anywhere along the Yungas Road?) Does your intended route include double black diamond singletrack? What resources will be available? How far might you have to pedal, push, or crawl to get to the nearest clinic?
Here are my suggestions for 2 (slightly) different first aid kits. These suggestions assume that the user does not have any allergies to, or contraindications for using included items and knows how to use them properly.
Home Land Security
A minimal kit or 5-7 days in the backcountry on mostly double and singletrack.
- Clean water (or a way to make clean—iodine tablets or a filtration system).
- Soap: Small packets of castile soap or castile soap wipes are convenient, but bar soap or Dr. Bronner’s will do the trick.
- Irrigation syringe (20cc is a good size).
- 4-5 Povidone-iodine (Betadine) prep pads/wipes/towelettes OR a small bottle of the solution (better for wound disinfection and healing than alcohol or hydrogen peroxide).
- 1 good pair of tweezers: Stainless, not plastic; pointed, not blunt (to remove spines, splinters, visible wound debris, and TICKS).
- Bandaids: Chose a small assortment for minor scrapes and cuts.
- 2-3 butterfly bandages or Steri-strips (if you can get ‘em).
- 1 small roll gauze bandage (kling wrap): Cut the gauze to clean wounds with iodine and/or use it to wrap wounds as needed.
- 1 large sized sterile non-stick pad: Cut it down to size as needed.
- 1 roll self-adhering compression wrap (Coban), or, if you aren’t as space/weight concerned, 1 elastic (Ace) wrap.
- 1 roll cloth/fabric tape: Duct tape may be used alternatively, but it’s just not as good at conforming to weird anatomical contours.
- Cravat or trianglular bandage (weighing ~0.09 lbs). Some folks swear by a cravat as a one-stop universal backcountry survival kit. With the proper knowledge, you can make tourniquets to stop major blood loss, splint fractures, plug puncture wounds, and to immobilize upper extremity injuries like dislocated shoulders, fractured collarbones, etc.
- Antibiotic ointment (Neosporin, Polysporin): 1 small tube or 2-3 “individual serving” packets. This is up for debate based upon the increased bacterial resistance, but, for now, go for it.
- 2-3 safety pins.
- Ibuprofen (for pain, sprains, muscle aches, inflammation).
- Benadryl (in case of minor allergic reactions such as insect stings, dermatitis from poison ivy, etc.).
- Epinephrine aka an EpiPen: I suppose this is a smart item for anyone to carry who’s spending a lot of time in the backcountry. In all honesty, I never have and probably won’t carry one in the future. BUT, if you’ve ever experienced an anaphylactic reaction or have experienced even moderate allergic reactions to insect or spider bites or contact allergens, you should carry one.
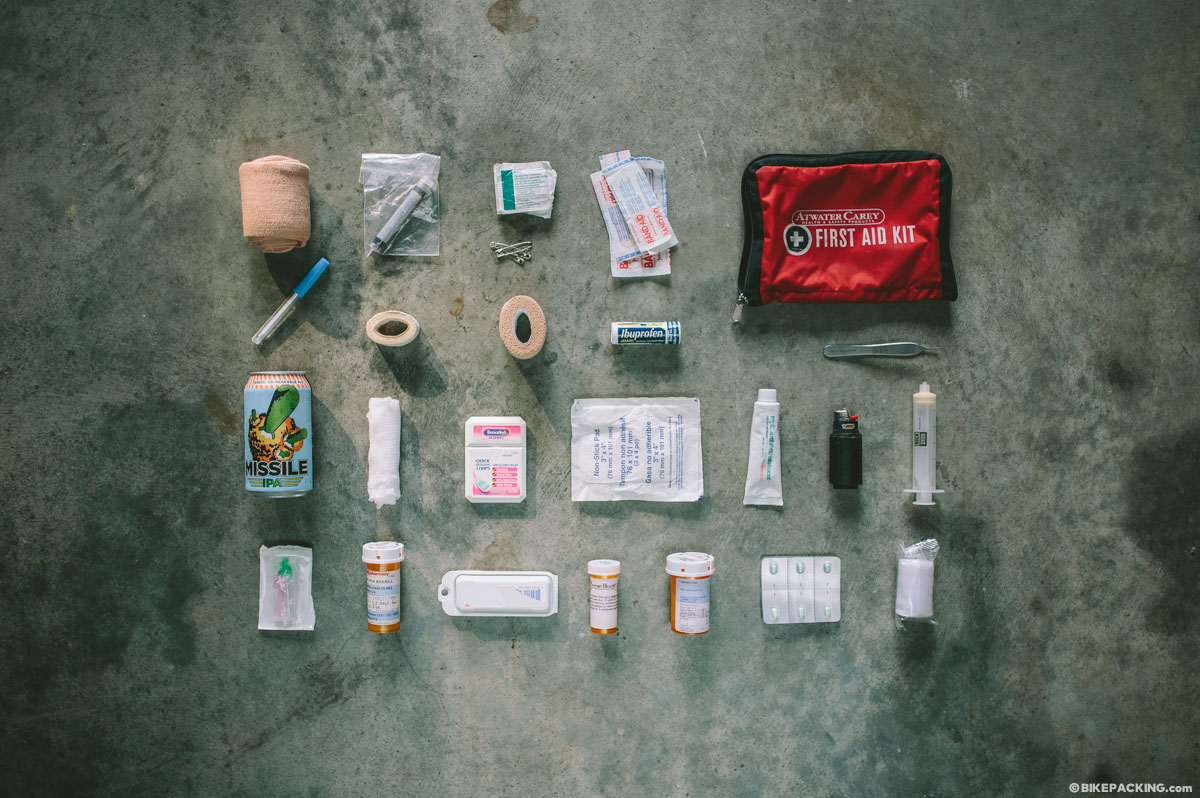
A Passage to India
2-3 months touring through rural or remote areas in developing, tropical countries, mixed terrain, including moderately technical singletrack:
- Clean water: Iodine tablets are quick, lightweight and effective, and, in this case, it doesn’t matter if the water tastes bad.
- Soap: Small packets of castile soap or castile soap wipes are convenient, but bar soap or Dr. Bronner’s will do the trick.
- Thermometer: Manual thermometers are generally more accurate, but require protection from breakage.
- Irrigation syringe for flushing wounds (20cc is a good size).
- Suture/syringe kit: This is probably overkill. Most likely, if treatment is available so are clean supplies, but if you are traveling to the Congo, you may want to play it safe. To get such a kit through customs often requires a letter from your doctor on letterhead stationary.
- A small handful of Povidone-iodine (Betadine) prep pads/towelettes or 1 small bottle. The bottle supplies a larger volume with less waste, but it adds weight and the risk of staining everything you carry.
- 1 good pair of tweezers: Stainless, not plastic; pointed, not blunt (to remove spines, splinters, visible wound debris, and TICKS).
- Bandaids: an assortment for minor scrapes and cuts.
- 4-5 butterfly bandages or Steri-strips (if you can get ‘em).
- 2-3 small rolls gauze bandage (kling wrap): Cut the gauze to clean wounds with iodine and/or use it to wrap wounds as needed..
- 2 large sized sterile non-stick pads: You can cut them down to size as needed. They wont be sterile anymore, just try to keep them clean.
- 1 roll self-adhering compression wrap (Coban).
- 1 elastic (Ace) wrap.
- 1 roll cloth/fabric tape: Duct tape may be used alternatively, but it’s just not as good at conforming to weird anatomical contours.
- Antibiotic ointment (Neosporin, Polysporin), 1 small tube or 5-6 “individual serving” packets.
- 2-3 safety pins.
- Ibuprofen (for pain, sprains, muscle aches, inflammation).
- Benadryl (in case of minor allergic reactions- insect sting, dermatitis from poison ivy, etc.).
- Tylenol (for pain and, more importantly, FEVER).
- Loperamide aka Imodium (for persistent diarrhea…helps treat the symptoms, not the cause). Unless you are in a remote location, cannot get to medical treatment AND are at risk of dehydration, do NOT use antimotility medications if fever or bloody diarrhea are present.
- Electrolyte replacement solution, tablets, or powder aka “rehydration salts”.
- 2 “courses” Cipro: Most travelers diarrhea is caused by bacterial infections. Although some bacteria have developed quinolone resistance, Cipro is still a standard first approach to treating TD. Begin treatment after you have experienced 3 or more loose stools within an 8 hour period of time. It is often prescribed at 500mg twice daily for 3 days. Single dose and 1 day therapy have also been well established. Discuss the options and recommendations with your MD.
- Epinephrine aka an EpiPen: If you are traveling abroad, with likely exposure to unfamiliar foods and insects, your chances of encountering a significant allergen increase.
Check the CDC website and/or refer to a travel clinic to make sure that you have received any recommended or required vaccinations. Also, be sure to carry written prescriptions(generic names) for any medications you may take on a regular basis. Malaria prophylaxis should also be considered depending upon your travel destination.
Note: The kits outlined here are simply guides based on our research; use your judgment and knowledge of your own health to formulate a personal first aid kit. And, if you’ve got any friends who are doctors or nurses, hit them up for a few supplies.
Please keep the conversation civil, constructive, and inclusive, or your comment will be removed.